
If you are new to the world of blogging and are a new website owner, in most cases you do not have to worry about website speed.
After creating your website or starting your blog, it may feel like everything is perfect.
Your site is beautiful, so that should mean people won’t have a problem waiting a few seconds for it to load properly, right? But no, it is not so.
When there are many posts on your website and your design becomes better, then you find that your website is no longer as fast as before.
According to Google, the longer it takes for a page to load, the more people will leave that website. Additionally,
Google has introduced Web Core Vitals (which count as ranking factors for websites) that go into even more detail about how fast websites load.
The faster your website is, the better your chances of reaching the first page of Google search. In this article you will understand the elements that affect the speed of your website.
With each element, I’ll show you a tool that will help you speed up the website or solve a particular problem.
Also, where possible, I will mention services that you can use safely, without spending hours on research.
14 Steps to Improve Website Speed | how to make website load faster
Step 1: Run a Speed Test
Before doing anything, it is important that you do a proper test.
Although you can do a lot without one, I strongly suggest running at least one speed test so that you have a benchmark,
that will help you understand how well your site performs, and your How good is the result after completing all the fixes by step.
Free Tools
Luckily, there are free speed tests available for anyone. All you have to do is choose one, enter your URL, and let the tool do its magic.
Google’s PageSpeed Insights
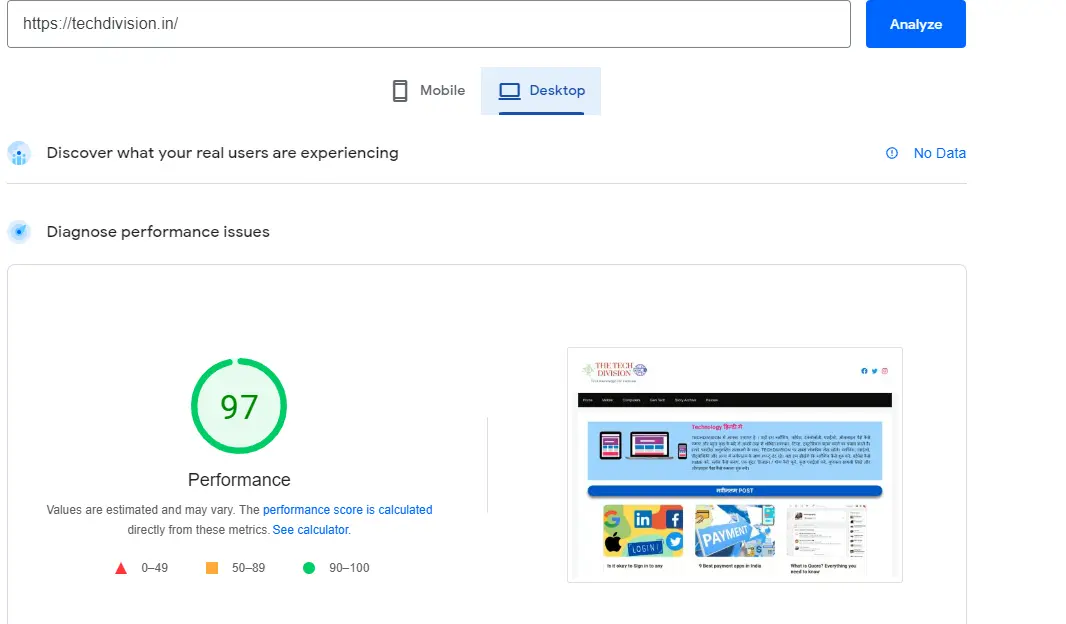
Since most people optimize their sites for Google, the first tool I’ll mention is Google’s PageSpeed Insights. It is quite easy to use, and you can get results in just a few seconds.
- Open Google’s PageSpeed Insights.
- Enter your site’s URL.
- Click on “Analyze” button.
After seeing the green number at the top where you aim to get a score of 100.
GTmetrix
One of the most popular website speed tests is GTmetrix. It’s completely free, and can be done in less than a minute:
- H
- For this go to GTmetrix.
- Type the full URL of your site.
- Press the “Run Test” button and wait for about 30 seconds.
After that, you will get a grade that will show you how fast your website is. The test will also show you details such as your site’s performance, its structure, as well as web criticalities which are now a main ranking factor for Google.
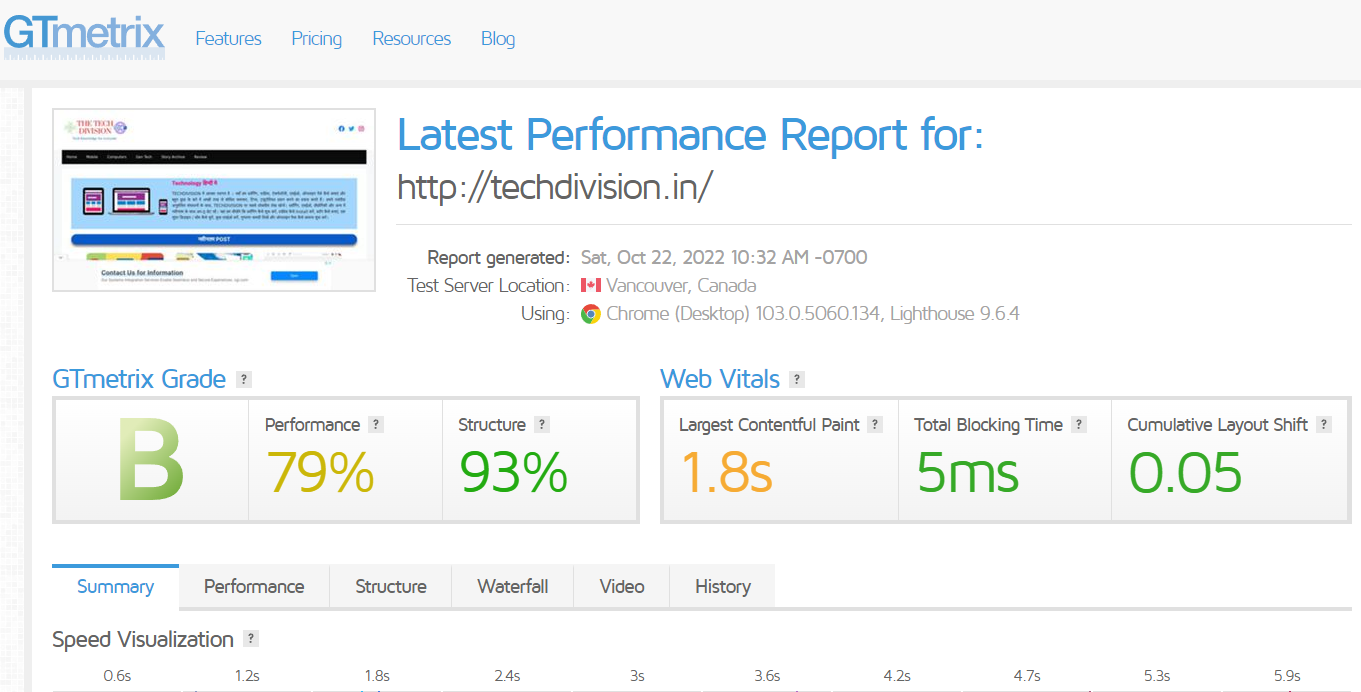
If you haven’t actively worked on optimizing your site speed beforehand, chances are you won’t get a perfect score. But don’t worry, if you start following all the steps you can work in that direction.
Step 2: Get Fast and Reliable Web Hosting
A fast website starts with good hosting. No matter how hard you try to deliver the best user experience, if your hosting sucks, your website speed will suffer.
The best hosting companies take care of everything, and you don’t need to understand what happens behind closed doors.
From quality and well-maintained hardware to regularly updated software components, there’s a lot a hosting service can do to improve your site speed.
To get started right, host your site with Bluehost or Hostinger, one of the rare hosting companies officially recommended by WordPress.org.
Years of experience and millions of hosted websites make this hosting company one of the best in its field – something that will easily translate into a stronger website.
Step 3: Hire a Content Delivery Network (CDN)
Although Internet speeds have improved significantly over the years, the physical distance between a computer and a server still plays a significant role in online speed.
This means that loading information from a server in your country will generally be faster than loading data from around the world, just as
it is easier for you to buy a table from a shop near your home, rather than one from another. You have to transport it from some other place. ,
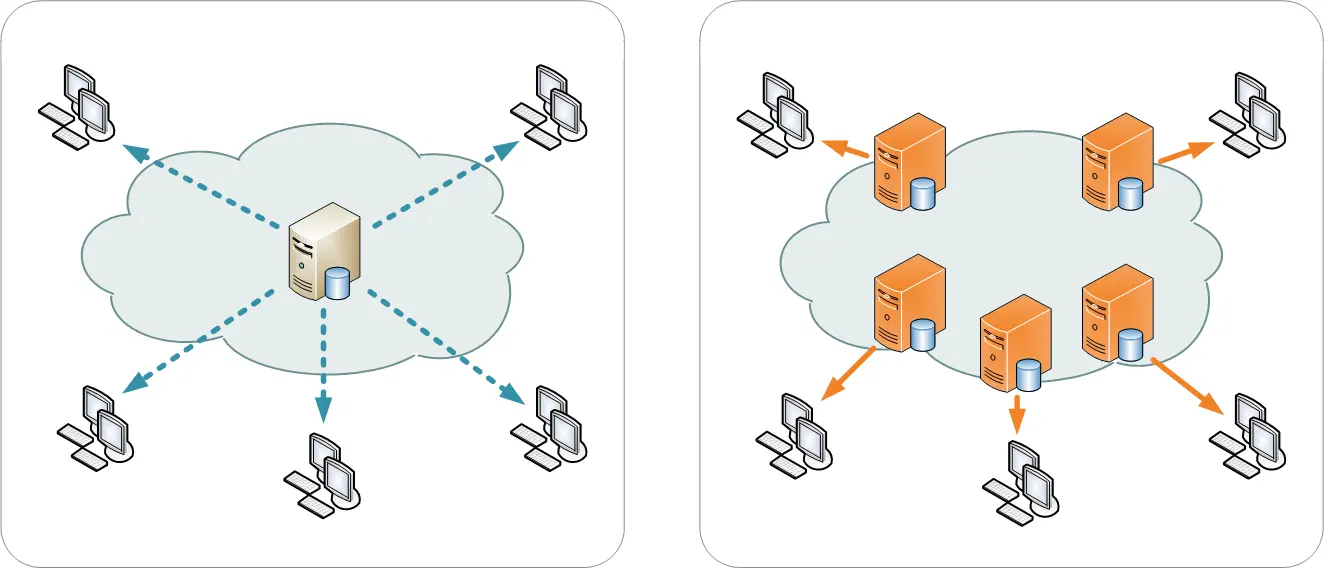
This problem can be solved with the help of CDN. They allow you to host your website on multiple servers around the world.
A CDN can identify the closest location of each user loading your site, and load the content from the nearest server.
So, if a visitor tries to load your site from the USA, they will receive content from one of the USA servers,
while someone coming from Europe will load your site through a server located closer to them, eg. In London for.
If you’re hosting the site on Bluehost, you can find their TrueSpeed CDN inside the Control Panel. By simply setting this up, your site will go global and load faster for people around the world.
You can also get third party CDN services. The most popular CDNs are:
Read More: India’s best 9 payment apps
Step 4: Minify CSS and JavaScript Files
Modern websites are filled with CSS and JavaScript files that work together to make web pages look good and work in users’ favor. These become unnecessarily large over time, which can quickly slow down your site.
Luckily, minifying your CSS and JavaScript files doesn’t require you to go through the code and make changes yourself. There are plugins that will do this automatically for you and make sure everything works correctly:
- Go to “Plugins> on the WordPress dashboard and go to Add New.
- Search for “autoptimize”
- Install and activate “automatically optimize”.
- “सेटिंग्स -> automatically optimize” पर जाएं।
- “Optimize JavaScript Code?” and “All JS files?” Check out.
- Optimize CSS Code?” And “All CSS Files?” Check out.
Step 5: Enable Browser Caching
By enabling browser caching, you allow your content to be stored in people’s browsers.
This means that if a visitor decides to return to your site, they won’t have to download all the files from the server again because they already have them stored in their browser.
Browser caching can significantly improve your website speed for returning users.
To enable it on your site, all you need is a free WordPress plugin like:
If you are using W3 Total Cache, all you need to do is install this plugin:
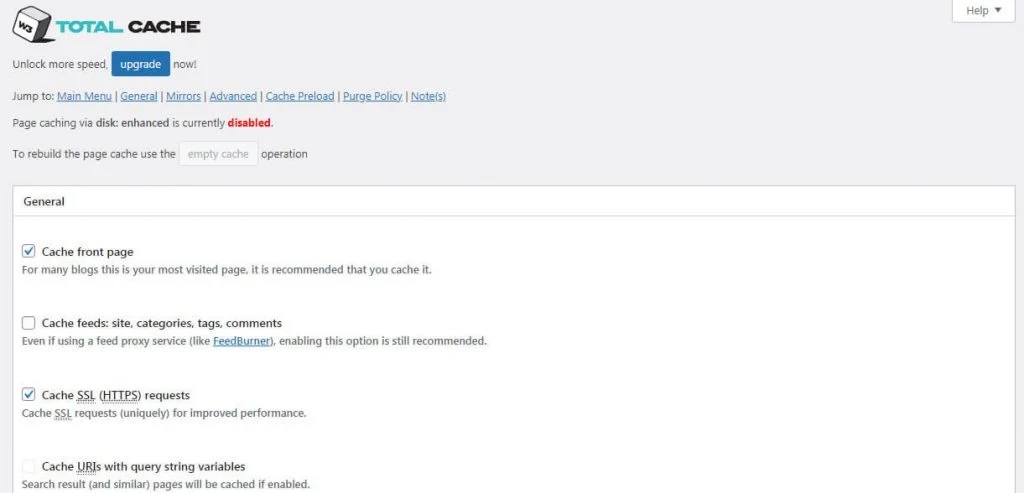
- Go to Plugins -> Add New.
- Search for “W3 Total Cache”.
- Install and activate the plugin.
- Allow plugins to access your site and server settings.
The plugin will automatically set your caching settings and they will start working in your favor immediately.
If you decide to go into more details, you can open the performance tab that now appears on the left side of the WordPress menu where all plugin settings are visible.
Here, you can change other options if necessary.
Step 6: Optimize and clean up the WordPress database
Your WordPress website cannot function without a database. Everything you do and everything you do on the site is stored there.
As you can imagine, themes and plugins don’t always keep it clean, so even if you uninstall a specific plugin, it will leave some data in your database.
Over time, the database will become disorganized and inefficient resulting in a slow website.
Although it is possible to clean the database manually, it will mean that you will have to understand how it works.
And even if you do, chances are you may still mess it up.
Luckily, there are free WordPress plugins available that will optimize and clean the database for you. However, before doing anything, make sure to create a full backup of your website. Because even though WP-Optimize is a well-known and safe plugin, optimizing the database can sometimes go wrong.
If something goes wrong, I suggest a pluging called WP reset. This plugin will create a snapshot of your site and give you the ability to instantly revert any changes made.
If something goes wrong, you can restore your database in a few minutes, unlike restoring a full backup which can take much longer.

Step 7: Use a customized and simple theme
For example, a template that loads five files and three images will load much faster than a template packed with ten files and twenty images.
This is not the only important factor, there are other things that need to be optimized if we want a fast website.
Since there are so many WordPress themes and templates available, it is hard to determine the best ones. Here are some popular WordPress themes that are designed to look good and load quickly:
Must read : Best WordPress Themes for your website
Step 8: Optimize All Images on Your Website
Images can easily become one of the main problems for your site speed. non-optimized images will remain unnecessarily large and difficult to download.
If you use too many of them, users will have difficulty loading the entire page of your website, and will likely leave before even seeing the content.
Luckily, keeping images optimized isn’t that difficult. It’s important that you check your theme/template to know what image sizes you need.
You can then optimize the images by resizing them and changing their quality settings before uploading.
If you only need to customize a few images, you can use a third party service like tinypng.
This image optimize tool will let you upload your images, and then they will be automatically optimized.
If you already have an active website and don’t have time to customize images one by one, there are many plugins that will solve all your problems like OMGF.
Step 9: Lazy Load Images and Videos
Typically, when a user opens a website, all of the displayed content is automatically loaded. Even if a user only needs the content above, they still have everything available on that page.
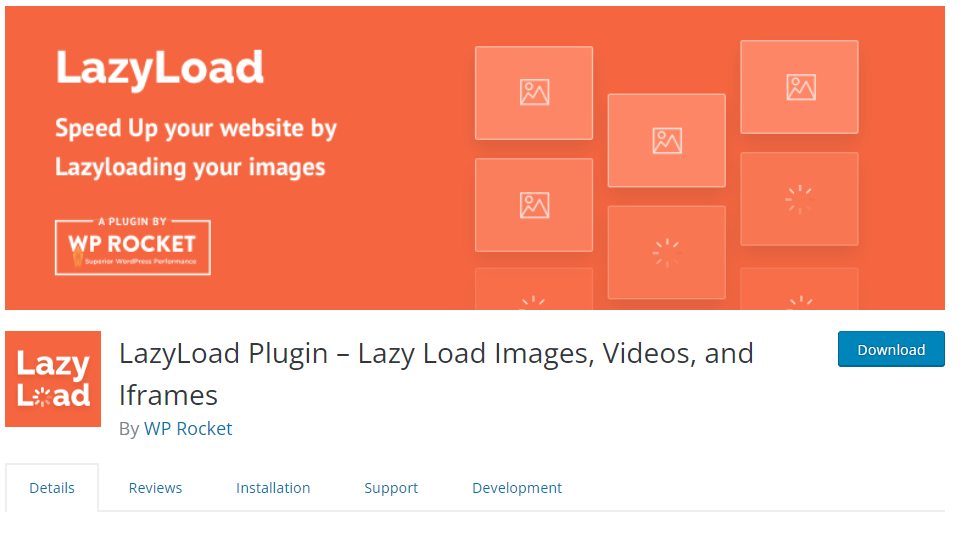
Instead of lazy loading images and videos, you can have users load only the content that is visible on the screen.
Once the user starts scrolling, images and videos that move into the visible area of the screen will begin to load. This way, the entire site will load faster and provide a better user experience.
Step 10: Prevent Image Hotlinking
Hotlinking is a process in which the source of an image is copied from one website for use on another website.
Your image will appear without any issues, it’s just not actually being loaded from your server. But still, it uses all the resources of the original site, and this slows down your website.
By preventing hotlinking, you can prevent other people from stealing your images.
This way, you can save resources on your hosting service, meaning your site will be the only site using your resources, resulting in a faster website for your visitors.
There are several ways to prevent hotlinking:
- Using a CDN: The most popular CDNs like Cloudflare and KeyCDN already offer hotlinking security.
- Using security plugins: Plugins like All-In-One Security (AIOS) – Security and Firewall give you the ability to control hotlinking.
- Disabling right-click on your images: Use a plugin like Prevent Content Theft [Disable Right Click.
- Modifying the .htaccess file: More advanced users can disable hotlinking directly by editing the code in the .htaccess file.
Step 11: Host Videos on Third Party Services and Offload Large Media
When you start a website, all your videos and large media files reside on your own server.
When it comes to your site speed, it is more convenient to offload videos and large media files to third party services to save bandwidth.
A video loaded from YouTube will work the same as a video loaded from your server.
And if you have more traffic, it means less impact on your bandwidth and results in a faster site.
Step 12: Keep plugins to a minimum
Each plugin enhances your website. However, each new feature also means new files that take up space and bandwidth.
Also, not all plugins are coded equally, so chances are you have a plugin that slows down your site by loading unnecessary elements that you may not even be aware of.
Step 13: Break long articles into shorter paragraphs
Sometimes you can do a lot by changing small things. If you write a blog, you can get a faster site by controlling the paragraph length of content.
When showing the latest articles from a blog, use excerpts instead of loading the entire article. With this your website will also load quickly.
If you write long articles, you can quickly break them into two or more parts. If you are using the block editor, you do not need external plugins.
Simply edit a long post, click the “plus” sign, and find the “Page Break” block that will split your article in half.
Step 14: Keep testing your website speed
Even if you successfully speed up your website with the help of this tutorial, it does not mean that your work is done.
Things can change quickly, and you never know how well your site will behave tomorrow or in a month.
This is why it is important that you perform regular speed tests and improve your site regularly.
You can bookmark this tutorial in case you forget where and how to test your site, as well as remember what steps you should go through to speed it up.
How a slow website can hurt your Business
Even if you don’t mind waiting for sites to load, most people have a problem with it. And if you ignore the problem, it can harm your business in the long run. How?
- High bounce rates – Even if your visitor decides to wait for a page to load, it doesn’t mean they’ll be patient throughout their entire visit. You risk high bounce rates that will force people to leave your site after visiting the first page.
- You May Lose Money – If you sell products or services on your website, a slow site will repel potential buyers and future customers.
- You May Lose Traffic – Do you want more traffic that will drive your site forward? In that case, you cannot afford to lose a visitor because your site is not properly optimized.
- Lower SERP Rankings – Google and other search engines take load speed into account. Even if your content is good, a slow page can result in you being pushed further down the search engine results.
Conclusion
Everyone loves beautiful and well-designed sites. But if your website has to wait a few extra seconds to load, chances are you’ll lose a percentage of visitors.
So, whatever you do, don’t sacrifice speed for beauty. It is possible to have both; You just need to be patient and keep working on your website to improve it.